Pages

Saturday, April 30, 2011

French Breakfast Puffs


"My mother had a great deal of trouble with me, but I think she enjoyed it."

-Mark Twain


These muffins remind me of my mother. She used to make them for us on some special occasion, or weekend. Hard to remember the frequency. They have got to be one of my all time favorite things to eat for breakfast. They are sweet and buttery, light and fluffy, with flavors of cinnamon and freshly ground nutmeg. Just heavenly.

They are incredibly easy to throw together. I always have the ingredients too. So when I get a craving there is little stopping me from satisfying it. Fortunately or unfortunately.


I've seen them called, "donut muffins." Makes sense. I've always known them as French breakfast puffs. I'm sure because that was the name of the recipe mom used. Not sure where she got it. Whatever you call them, if you have never made these or eaten them, you really should. For using such simple ingredients, and being so easy to make, they are absolutely spectacular. Of course butter, cinnamon and sugar on the outside of a shoe would taste good, but these morsels are so light and fluffy on the inside, they are ethereal.

I have 3 sisters. I believe we all love them, and I think we all make them. I know my older sister does. She made me a cookbook with all of my mothers recipes in them, including this one. Next to the recipe she says, "The people at my work call these, Balls of Sin."

Balls of sin indeed.


I think these are appropriate for the upcoming mothers day. Mom would love you if you made her these Mothers day morning. Also they would be great for kids to make for their mom. If only children were reading this, if they were, you moms out there would be in for a treat. They are easy enough for children to make, and fun, with all of the rolling around in butter and sugar.


a rainbow we saw yesterday

the sky was so gorgeous yesterday I had to capture it


French Breakfast Puffs

This recipe makes about 16 large muffins. (I filled the cups 3/4 of the way full.) If you fill the cups 1/2 way to make a slightly smaller muffin, you should get 22-24 muffins.

Ingredients for muffins

2/3 cup (140 g.) soft butter
1 cup (204 g.) sugar
2 eggs
3 cups (443 g.) all purpose flour
2 tsp baking powder
1 tsp salt
1/2 tsp fresh ground nutmeg
1 cup (250 ml) milk

For topping

2/3 cup (140 g.) butter, melted
1 cup (204 g.) sugar
2 tsp cinnamon

Directions

Preheat oven to 350 degrees Fahrenheit, 180 degrees Celsius, Gas Mark 4.

Grease 16 (if making them large, or 24 if making them small) muffin cups.

In the bowl of a stand mixer, or in a large bowl with a hand mixer, cream together the butter, sugar and eggs. In another bowl whisk together the flour, baking powder, salt and nutmeg. Stir in half the dry ingredients with the butter mixture, then stir in half of the milk, then mix. Add the rest of the dry ingredients, then the rest of the milk. Blend until just combined.

Divide up batter amongst muffin cups. I filled them 3/4 of the way full and got 16., If you fill them at about half you will get more, about 24.

Bake in preheated oven for 20-22 minutes. Or until a toothpick inserted in the middle of one of the muffins comes out clean.

While muffins are baking, mix together the cinnamon and sugar for the topping.

When muffins are done, melt the butter and immediately dunk the muffins, one at a time, into the melted butter. Make sure you cover it all, top, bottom and sides. Then dip it into the cinnamon sugar mixture, again, making sure you cover the whole thing with cinnamon and sugar.

They are best eaten right away.

Thursday, April 28, 2011

Melissa's Famous Banana Bread


"How can a nation be great if its bread tastes like Kleenex?"

 
-Julia Child


Alright I said it. My banana bread is famous. I don't like to brag, but I believe this bread is one of my most frequently asked for recipes, and something I'm asked often to bake for others.

 My husband really likes banana bread so many years ago I spent time finding a recipe I liked, then tweaking it here and there to get it exactly to our liking.

I like to make it because 1. It's easy. 2. I always have tons of over ripe bananas in the freezer. 3. It makes 3 loaves, so I can always put one in the freezer, give one as a gift, and still have one left over for eating right now.


This bread is full of bananas. 8 to be exact. So many bananas keeps it super moist and full of banana flavor. The 2 cups of yogurt adds to the moistness, to make this bread exceptionally moist. Something I long for in a quick bread.

I like to add walnuts, because my husband prefers it that way. But if you aren't into nuts, or have someone who is allergic, no biggie. If you omit them, it is still wonderful. Or you could even add chocolate chips for a fun twist.


Melissa's Famous Banana Bread

makes 3 loaves

Ingredients

3/4 cup  (1 1/2 sticks) (174 g.) butter

1 1/2 (292 g.) cups white sugar

1 1/2 cups (260 g.) brown sugar

3 eggs

8 very ripe medium bananas, mashed

 2 cups (500 ml.) (16 oz / 1 pint) plain yogurt or sour cream

3 teaspoons vanilla extract

3 teaspoons ground cinnamon

1/2 teaspoon salt

3 teaspoons baking soda

4 1/2 cups (652 g.) all-purpose flour

1 cup (96 g.) chopped walnuts (optional) or chocolate chips, plus a handful more for topping loaves

grated nutmeg (optional) (I use approx. 1/2 tsp fresh grated nutmeg)


Directions


Preheat oven to 325 degrees Fahrenheit, 160/170 degrees Celsius, or Gas Mark 3.

Grease 3 large loaf pans.

In a large bowl with a hand mixer, or in the bowl of a stand mixer, cream butter, sugar and brown sugar together. Mix in eggs, mashed bananas, yogurt, (or sour cream) and vanilla.

In separate large bowl mix together flour, baking soda, salt, cinnamon and nutmeg (if using). Add dry mixture to wet mixture and mix. Stir in nuts or chocolate chips if using. Divide into prepared pans about 3/4 of the way full.  Top loaves with the reserved walnuts, or chocolate chips.

Bake for approx 50-70 minutes, until a toothpick inserted in center comes out clean.
 
Cool on wire racks in pan for 20 minutes, then remove from pan by running a knife along the inside of the pan to loosen, then place bread on a rack until fully cool. Then wrap in plastic wrap, or place in an airtight container.
 
These freeze well. Just double wrap them in plastic wrap, then put them in a large ziplock bag. 
Set them on the counter for a few hours to thaw.

Tuesday, April 19, 2011

Individual Pineapple Upside Down Cakes


If you're afraid of butter, as many people are nowadays, just put in cream!”

Julia Child

These little cakes are just divine. I made them for the first time a few months ago when in was in California. My sister and I made them for a dinner we hosted at her home. I just loved them. I served them with honey pine nut ice cream, which was heavenly.


I had a dinner here a few nights ago, and I had 2 fresh pineapples on the counter, I saw them and this dessert immediately came to mind. This time I had no pine nuts. I scavenged the pantry and found macadamia nuts, a fine substitute, I thought. Honey macadamia nut ice cream I made, the base, that is. I went to the garage fridge to retrieve my mixture, ready to freeze it in the ice cream maker, and dropped the whole shebang on the floor.

Alas, no honey macadamia nut ice cream for us.


I ended up making banana coconut ice cream to serve with these delightful little cakes.


Rich with butter, with a hint of cardamom, these cakes are truly moist and delicious. The pineapple on the bottom (or top after it's all said and done) is loaded with butter, brown sugar and flavored with vanilla bean.

I purchase my cardamom in the bulk spice section of my natural food store. It's very reasonably priced there. If you buy it at a regular grocery in the spice aisle, it can be quite spendy.

For a more traditional cake, just omit the cardamom, it will still be delicious.


Individual Pineapple Upside Down Cakes

adapted from this recipe from Firefly Bistro in South Pasadena, Ca.

this recipe makes 13 ish individual cakes, if you don't need that many, it can easily be halved

Ingredients

2 whole pineapples peeled. cored, and diced into small pieces, or about 4 cups (750 g.) diced pineapple
1 1/2 cups (260 g.) brown sugar
3 sticks (1 1/2 cups) (349 g.) of unsalted room temperature, butter,  plus a few tablespoons for buttering ramekins
1 vanilla bean
1 cup (122 g.) sour cream or yogurt
4 eggs
3 tsp. vanilla extract
2 1/2 cups (252 g.) all purpose flour
1 1/2 cups (292 g.) granulated sugar
1 tsp baking powder
1/2 tsp baking soda
1/2 tsp salt
1 1/2 - 2 tsp. ground cardamom

Preheat oven to 350 degrees Fahrenheit, 180 degrees Celsius, Gas Mark 4.

Melt the 2 tablespoons butter in a small dish, and brush the sides of 13, 1 cup (8 oz) or (250 ml.) size ramekins, set aside.

In a large skillet, melt one stick of the butter (113 g.) with the brown sugar on medium heat. Split and scrape the seeds out of the vanilla bean, place the bean and the seeds into the brown sugar mixture. Add the pineapple pieces and cook on medium heat for about 15 minutes.

Meanwhile, in a medium bowl whisk half of the sour cream (or yogurt) (1/2 cup) with the eggs and vanilla extract.

In the bowl of a stand mixer, add the flour, granulated sugar, baking powder, baking soda, salt and cardamom and mix it together. Then add the remaining butter (2 sticks) and remaining sour cream (1/2 cup) and beat on low speed until smooth, then beat on medium speed until fluffy. Add the sour cream, egg mixture and beat again until fluffy, 2 minutes.

Spoon the pineapple and sauce into the ramekins, covering the bottom with pineapple, and spooning about 3 tablespoons sauce over the pineapple. Then scoop the cake batter over the pineapple mixture and smooth it out. Put the filled ramekins on a baking sheet with sides then put in the oven.

Bake for 30-40 minutes, until a toothpick comes out clean. Cool for at least 10 minutes on a wire rack, then using a knife, go around each cake to loosen it, then flip over on a plate. If you made these early in the day, to serve at night, it's o.k. to leave them in the ramekins until then.

Serve room temperature, or warm.

Sunday, April 17, 2011

Fruity Spring Cereal Squares


"And Spring arose on the garden fair,
Like the Spirit of Love felt everywhere;
And each flower and herb on Earth's dark breast
rose from the dreams of its wintry rest."

Percy Bysshe Shelley


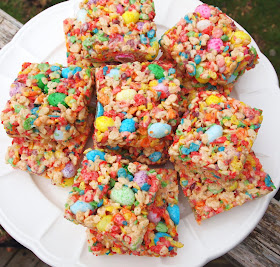
I hadn't thought of Fruity Pebbles since I was like, 5 years old. Then one day a few weeks ago, I needed an MRI. I needed IV sedation, I'm claustrophobic, you see. One of the drugs they give you for that is an amnesiac. After the procedure, my husband was driving me home, and I saw a bakery that I love called, Corina in Tacoma, WA. Of course I said, "stop!" I can't miss visiting a great bakery when I'm that close to one, drugged or not.

I went inside, and there they were. These cereal squares made of fruity pebbles, rice krispies and jelly beans. I ordered one. I also ordered something else, something more proper, cake? Perhaps? I was on drugs, amnesia drugs, I shouldn't have even remembered these squares. But I couldn't forget them, they laid on my mind. That's how much of an impact they had on me. Silly, I know. I knew I needed to recreate them. So here we are.


Like I mentioned, I hadn't had Fruity Pebbles in a very long time. Turns out I love them. I also really enjoy rice krispy treats, so yeah these rock. They would be great for an Easter gathering. I think children would adore them. How could they not? Candy, sweet cereal, marshmallows, what's there not to love?


Beware, these are quite sweet. But oh so heavenly.


House of Lucien is where I sell vintage china, glassware and collectibles, and be sure to visit 
Coco's Kitchen for vintage cookbooks, vintage Pyrex, kitchen items and more! 


Never miss a post! Follow The Alchemist on Facebook! Or Pinterest


Fruity Spring Cereal Squares

Ingredients

1- 1 lb bag (454 g.) of mini marshmallows
6 cups (200 g.)  fruity pebbles cereal
2 cups (80 g.) rice krispies
1/3 cup (75 g.) butter
2 cups (380 g.) jelly beans

Directions

Grease a 9x13 pan, then place parchment paper in it, hanging the edges off the sides to create a sling. Then grease the paper.

Place the butter in a large pot and melt it on medium heat. When butter is melted, add the marshmallows. Stir them into the butter, melting them as you go.

Add the cereals and the jelly beans to a large bowl and stir it all together. This will help the jelly beans distribute evenly. When the marshmallow mixture is all melted, remove from heat, and add the cereal/jelly bean mixture. Mix it all together. It will be sticky. Duh. I don't think I needed to tell you that.

Using a greased spatula, or greased hands, pack mixture into your prepared pan.

Refrigerate until cold, then cut into squares.

Tuesday, April 12, 2011

Hawaiian Bread and Strawberry Butter


"Bread is the warmest, kindest of all words. Write it always with a capital letter, like your own name."

-from a cafe sign

Oh how I love fresh homemade bread. I confess, I often let the bread machine do the heavy lifting. I like to bake it in the oven, though. It may be because my bread machine isn't the greatest, I'm not sure. But I prefer the results from baking it in the oven.

I was craving some good bread as a vehicle for spreading some strawberry butter, something I have blogged about before a very long time ago, (before I paired it with strawberry bread, so if you want to be in a strawberry coma check that out.)


I love strawberry butter. Just a compound butter that is sweet and a bit salty if you used salted butter, which I usually do in this recipe. But it is oh so decadent. A wonderful Spring treat if you ask me.


Purchasing yeast this way is only 3 bucks and change and lasts over 2 years

I buy yeast in this big 2 lb bag. It's only 3 bucks and change at Costco. I recently had to throw out my last bag purchased about 2 1/2 years ago it had finally lost it's potency, but I hadn't even used half the bag. If you bake bread frequently, even if you don't plan on using all of this, it's certainly a better deal than buying those little packets for about 1.50 for 3. That means if you bake more than 6  loaves over a 2 year period than it's worth the purchase.

Better still, split it with another bread making friend or 2.

Store it in an airtight container in the fridge, lasts longer there.


I've always loved Hawaiian Bread. This version isn't too sweet. Just a touch so.


Hawaiian Bread and Strawberry Butter

This recipe is for a bread machine. I personally use a bread machine for the dough, then bake it in the oven.

Ingredients for bread

1 cup (250 ml.) warm milk
1/4 cup (55 g.) soft butter
2 eggs
1/3 cup (77 g.) sugar
3 1/2 cups (550 g.) flour
2 1/2 tsp yeast, or 1 packet
1 tsp salt

Directions

Place all ingredients in bread machine in order recommended by manufacturer. Mine is liquids first, then dry ingredients. The order the ingredients are listed is how I add them to mine.

If you want to bake the bread in the machine, then choose the appropriate cycle. If you want to bake it in the oven, then select the dough cycle.

If you have selected the dough cycle, when the dough is finished, remove it from the machine, and place it in a greased loaf pan. Let it rise until doubled in size. Then bake it at 350 degrees Fahrenheit, 180 degrees Celsius, or Gas Mark 4 for 40 minutes. When it's finished brush the top with melted butter if desired.


For Strawberry Butter

Ingredients

1 cup (155 g.) sliced fresh strawberries
1 cup (230 g.) butter, softened and cut into tablespoon sized pieces
1/2 cup (90 g.) sugar

Place the strawberries and sugar in a bowl and stir. Let sit for 5 minutes. Place all ingredients in the food processor and let er rip. After a few minutes scrape down the sides of the bowl to make sure all has been incorporated. Start again if needed.

Place butter in a jar or container and place in the fridge. This is best served at room temperature so if you are making it ahead of time, then make sure to give it time to set on the counter before serving.

This made me 2, 8 oz. jars. This butter freezes well, just bring to room temperature before serving.

Thursday, April 7, 2011

Ritz Cracker Butterscotch Cookies


Cookies are made of butter and love. ~Norwegian Proverb


If you saw my Pretzel, Chocolate Chip and Caramel cookies, then you know I like to put all kinds of salty things in a cookie. I saw the Ritz crackers in the store and knew I wanted to transform them in to what you see before you.

 I love the buttery goodness of Ritz crackers. In this cookie I wanted to push the limits of that decadent buttery flavor by adding the butterscotch chips and some butter pecan extract.

These cookies are a bit crunchy on the outside, and chewy when you bite into them.

crushing up the Ritz crackers


before going in the oven


The flavor of the Ritz cracker isn't very pronounced, because well, Ritz don't have a particularly strong flavor. But they do add a mild butter flavor and a nice saltiness that I quite liked.

These divine cookies are ever so salty, sweet, and buttery. A perfect combination if you ask me.

I didn't add nuts to these, but I believe some pecans would be a lovely addition.


Ritz Cracker Butterscotch Cookies

This recipe makes about 2 dozen cookies

Ingredients

1 1/2 cups (90 g.) crushed Ritz Crackers, this is almost one sleeve
1 1/4 cups (250 g.) brown sugar
1/2 cup (one stick) (113.5 g.) butter, softened
1 egg
1 cup (150 g.) flour
1 cup (150 g.) butterscotch chips
1 tsp vanilla
1 tsp butter pecan extract, or butter extract, or if you don't have any of those, just add one more tsp of vanilla
1/2 tsp baking soda
1/2 tsp baking powder
1/2 cup (57 g.) pecans chopped, (optional) if desired

For topping each cookie

a few more tablespoons of butterscotch chips
a handful more Ritz crackers, broken up in pieces

Directions

Preheat oven to 300 degrees Fahrenheit, 150 degrees Celsius, Gas Mark 2.

With an electric mixer beat together the butter and brown sugar until fluffy. Add the egg and the extracts and beat again. Scrape down the bowl and beat. Then add the flour, baking soda and baking powder then mix again. Add the crushed Ritz crackers and butterscotch chips and stir well. Add the nuts if using and stir.

Using a 1 1/2 tablespoon sized measure, scoop the dough onto parchment lined baking sheets. Place a few butterscotch chips and Ritz pieces on top of each cookie.

Bake for 17 minutes. Let cookies cool on baking sheet for 10 minutes. Then transfer to wire racks to cool.

Sunday, April 3, 2011

Orange Mascarpone Tart


"When you squeeze an orange, orange juice comes out -- because that's what's inside. When you are squeezed, what comes out is what is inside."

- Wayne Dyer

This tart is one of my favorite uses for Mascarpone cheese. So when I made my own, I knew  I wanted to make this tart.


It features flavors from the middle east. Honey, oranges, cardamom and pistachios. I love that it is unique. Which I think makes it perfect for a dinner party. I've made this tart a number of times and whenever I serve it to guests it always gets rave reviews.

It's easy too! And can be made earlier in the day, so it's ready when you are.

Orange Mascarpone Tart

adapted from this recipe

Ingredients

1 pie crust for a 1 crust pie, or use a refrigerated or frozen crust
2-3 large navel oranges
1 8- to 8.8-ounce (227 g.) container chilled mascarpone cheese, or 1 recipe of homemade mascarpone
1/2 cup (125 ml) chilled heavy whipping cream
1/4 cup (45 g.) sugar
3 tablespoons honey
1/2- 1 teaspoon ground cardamom
2 tablespoons chopped pistachios

plus more honey for drizzling

Directions

Preheat oven to 400 degrees Fahrenheit, 200 degrees Celsius, Gas Mark 6.


Press pie crust onto bottom and up sides of 9-inch-diameter tart pan with removable bottom; fold sides in and press to extend sides 1/4 inch above rim of pan. Pierce crust all over with fork. Bake until golden brown, about 30 minutes. Cool completely on rack.


Meanwhile, use a microplane to zest 2 oranges and set aside the zest. Cut off remaining peel and pith from oranges. Cut the oranges in half, then slice 1/2 inch slices. Place orange slices on paper towels to drain slightly.

Combine mascarpone, cream, sugar, the 3 tablespoons honey, cardamom, and orange peel in medium bowl. Using electric mixer, beat just until blended and peaks form (do not overbeat or mixture will curdle). Spread filling evenly in cooled crust. Arrange orange slices atop tart in concentric circles; sprinkle with pistachios.


Lightly drizzle honey on top of whole tart.


This can be made early in the day and refrigerated.