Pages

Friday, November 19, 2010

Pepper Jelly


"Thanksgiving Day comes, by statute, once a year; to the honest man it comes as frequently as the heart of gratitude will allow." -Edward Standford Martin
.
This post is 3rd in a series, Handmade Holiday Gifts.

I'm up to it again, making jams and jellies! I don't usually make savory jellies, so this is unusual for me, but wonderful. I had some peppers left over from something, so I put them to work in this tangy, spicy, sweet jelly. The great thing about this is if you make it in the little 4 oz. wide mouth jars, it makes it the perfect size for opening up and using immediately with some cream cheese and crackers as an appetizer. So it really does make a great gift, hostess, or otherwise. Something else makes this a great gift, it's beauty. It's very colorful and pretty. I used yellow and orange bell peppers along with red jalapenos to stick with colors that worked well together. You can also go with green, using green bell peppers and green jalapenos.
.
I'm not even a fan of peppers so much. But I am a fan of this jelly, because I love the combination of flavors. A little heat, and the tang from the vinegar is irresistible. You can adjust the heat as you like it, it is quite flexible.

I also like the versatility of this jelly. Sure you can use it as I did, spread on top of some soft cheese on a cracker, very delicious. Or even mix the cheese with the jelly as a spread. On a sandwich would be equally amazing.


Colorful Pepper Jelly
adapted from "Autumn in the Country" a Gooseberry Patch book

1 cup bell peppers, your choice of colors, minced small
1/2 cup chopped jalapeno peppers, minced small (I left a few seeds in a few, for a little heat. If you don't like things spicy, don't use any seeds.) Oh, and use some gloves when handling them.
red pepper flakes (optional, if needed)
1 1/2 cups cider vinegar
5 cups sugar
6 oz package liquid pectin
canning jars (this recipe makes 5 0r 6, 8 oz jars)

Combine peppers, sugar and vinegar in a large stockpot over medium, high heat. Bring to a rolling boil. Boil for 3-4 minutes. Remove from heat. Add pectin, stirring constantly. Let mixture stand for 2 minutes.

Take a spoonful in a small bowl and put it in the fridge for a few minutes to cool. When it's cool enough, taste it. If it's not spicy enough, you can add some red pepper flakes.

Pour into hot, sterilized jars, leaving 1/4 inch head space. Wipe rims; secure lids and rings. Process in a boiling water bath for 15 minutes. Remove from heat and leave them in the water for 15 minutes. Remove jars from pot, set jars on towel to cool. Check for seals.

*edited to add* I forgot to mention, the pepper pieces will rise to the top, to get the peppers throughout the jelly, shake up the jars periodically while they are cooling.

*Note* Liquid pectin and powdered pectin are not interchangeable. The recipe would need to be altered to use powdered.

Instructions for using the boiling water canning method

31 Ways to Eat Pepper Jelly

Monday, November 15, 2010

Thanksgiving

"Thanksgiving is the holiday of peace, the celebration of work and the simple life...a true folk-festival that speaks the poetry of the turn of the seasons, the beauty of seedtime and harvest, the ripe product of the year-and the deep, deep connection of all these things with God.


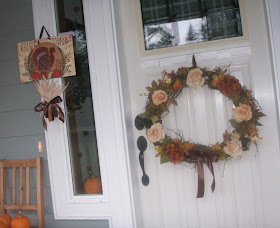
I've been making Thanksgiving and fall wreaths, here are a few, the above picture isn't the best, and you can't see the wreath so great, but heck, I love it and had to post it anyway. I tried and tried to get a good picture but with the light behind it, oh well, you get the idea.

The wreath in the kitchen


I wanted to share some links to my favorite Thanksgiving recipes. Only the tried and true.


Let's talk yams, I think they're my favorite part. I like a riff of the old marshmallow kind, sweet.

I like them so much I make 2 kinds. Last year I made 2 types to try a differernt recipe while being able to enjoy a kind I know I really like. I didn't want to be dissapointed if the new recipe didn't deliver. I'm so glad I did! The "new" recipe is one that's pureed with coconut milk. I think my guests liked that one better actually. I really liked it myself, but I can't choose a favorite, so 2 yam dishes it is again this year!


Sweet Potato Coconut Puree-I'm going to add a coconut/pecan topping to this.


Whipped Sweet Potatoes with Brown Sugar-Pecan Topping, (there are also cornflakes in the topping which really makes this yummy) This is my favorite recipe I've made the last few years.


Stuffing, also a favorite. O.K. it's all my favorite, not really. Not the turkey. Don't love it but when covered in gravy and cranberry sauce, it's good enough.


I like my stuffing old fashioned and full of fresh sage. This one delivers. Although I do double the amount of fresh sage to this recipe.


Sage Stuffing-like I mention, I double the sage.


The front door with my pumpkins, which I still have a good bunch left. Yay for me!


Cranberry sauce, also something I love. I like the tangy tartness along with the mashed potatoes, stuffing and turkey. It's so easy to make your own, and so worth it. This one features port wine and tangerines, I made this last year and loved it.


Cranberry Sauce with Port Wine and Tangerines


And for the grand finale? This cinnamon ice cream goes with whatever I make each year.


Last year it was Pumpkin Pecan Pie with Whiskey Butter Sauce. This was really delicious. The whiskey butter sauce is amazing. That's why this year I will make Pumpkin Bread Pudding with that whiskey butter sauce. And an apple pie with a caramel sauce, served with the cinnamon ice cream of course!


Happy Thanksgiving!

Homemade Blackberry Liqueur


"A fruit is a vegetable with looks and money. Plus if you let fruit rot, it turns into wine, something brussel sprouts never do". -P.J. O'Rourke


This post is 2nd in a series, Handmade Holiday Gifts.
We live on 10 acres. Most of it is wild. Luckily for us, (or unluckily) however you see it, a portion is wild blackberries. Luckily, is obvious. I get to make fun stuff like this liqueur. Unluckily because they are considered among these parts as a pretty invasive weed. We have other weeds growing that don't contribute to my kitchen projects, (did I mention a good portion of our land is wild?) so I'll call it a blessing for now.


What this all means is I have a great deal of wild blackberries in the late Summer every year. If I want to use any of them I have to pick them, arduous, tiresome work. Yes it takes hours, one tiny berry by one tiny berry at a time, and yes, I get scratched something fierce. A few years ago my picking arm swelled up so bad I thought I needed medical attention. Since then I wear long sleeves. But no gloves, although I did try. For some reason I need the feeling in my hand to know if that's a berry I want to pick, I need that sensation gloves won't allow.


I'm not complaining, well, perhaps I am. But on a nice day, it is a good way to spend time. Nature is a beautiful thing. I do see birds often while picking, perhaps they are "picking" too. Don't know the names or species of them, and it's so far away from our house, it's a good walk where the berries are in relation to our house, my husband isn't around to ask. He seems to always know the type of bird we're spying when we're together.


They aren't like the berries at the store. They aren't as sweet, and they have more seeds. There are applications for them, but this liqueur is an absolutely excellent use for them. Somehow all of the great blackberry flavor is extracted, leaving heavenly, sweet, berry alcoholic bliss behind.


Did I mention it's easy? Yeah, throw the fruit, vodka, sugar and some water in a jar and call it a day. Come back every once in a while to shake things up, and in a month it will be ready to strain and bottle. Ready to give to a friend, a really good friend.


Blackberry Liqueur


This isn't a recipe exactly, just a guide. Depending on how much fruit you have and how strong and sweet you like it. This can be used with a variety of different fruits. Blackberry of course, raspberry, or strawberry would be awesome. I think plum sounds good too.


Fruit-here I used blackberries, enough to fill a jar 3/4 of the way full

sugar

vodka

water


These will be the measurements for one quart sized jar.


Fill the jar 3/4 of the way full of fruit. Add one cup of vodka. (I tried to use more and it was way too strong for me.) If you like it strong, go ahead and add more vodka. Add one cup sugar. It sounds like a lot, but we're making a liqueur, or a cordial, a sweet after dinner type drink. (Or that's what I was making I should say.) You will have some room left in the jar, add a few inches of water, then put on the lid. Give it a few good shakes. I store it in the fridge. Every few days (or when I think about it) I shake it up some more. After a few weeks I taste it. It may need more sugar for your taste, (who am I talking about? It usually always needs more sugar for my taste.) So at this point I pour it all in a bowl and adjust the flavors as needed. If too strong, add water, if not sweet enough add more sugar, you get the idea.


After a month it's probably good to go, although it will wait for you to drink it for, ever, I think.

Go ahead and strain it and bottle it up, and it's ready to go.

Monday, November 8, 2010

Satsuma Mandarin Marmalade

"Autumn... the year's last, loveliest smile."
-William Cullen Bryant


This post is first in a series entitled, Handmade Holiday Gifts.

It's that time of year. The time when they have those 5 pound boxes of little mandarin oranges. A good time indeed. A time right before Thanksgiving preparation, and certainly before Christmas, although you would think Christmas was a week away by the looks of stores.

A perfect time for making jams and jellies, when some fruits are still ripe and luscious and you have some leisure time. Jams and jellies are great for gift giving, for holiday gifts, and for hostess gifts. I love making homemade gifts from the kitchen. It's something I enjoy doing, so I've decided to focus on posting about some of these in the days leading up to Christmas.

This marmalade makes a lovely gift. Either in a basket with other jellies or jams, or with a loaf of homemade bread, or by itself with a ribbon and little spoon tied to the neck. Either way I'm sure it's recipient will be delighted. Or just make it for yourself and your family. It is quite delicious. It's tangy and sweet, just right. Marmalade requires no pectin, there is enough natural pectin in orange peels for it to gel on it's own. All you need is sugar, the fruit and some lemon juice. You can choose to can this using the water bath method to store on the shelf, or you can just freeze it. If it is not preserved you can let the recipient know to keep it in the fridge. It will last for months if kept refrigerated (if it has not been canned of course.) If it has been canned it will last for years.

If it is your first time canning and you choose to can this using the water bath method I suggest you research how to do it here at the Ball website. They have step by step instructions.
I made this 3 times. It took exactly the whole 5 lb box of Satsuma Mandarins to do so. One of the batches I made Cranberry Satsuma Mandarin Marmalade, for a change. I've included instructions below on how to make that as well.

Satsuma Mandarin Marmalade
adapted from this recipe

makes 3, 8 oz jars

Ingredients

9 Satsuma Mandarin oranges
water
1/4 cup lemon juice (I prefer fresh, but you can use bottled also)
4 cups sugar
1/2 teaspoon butter

Directions

Wash the oranges then peel them. Set the peel and fruit aside separately. Slice the peels into fine julienne strips, really get them as thin as you can, then cut them in half, about an inch long or so. Put the peels in a large heavy stockpot, add 2 cups of water and bring it to a boil. Boil the peels for 10 minutes. Drain the liquid off of the peels, then put the peels back in the pot with 1 cup of fresh water.

Meanwhile if you are canning these, get your jars ready in a pot with boiling water, allow them to simmer while you are making the marmalade.

In the bowl of a food processor add the oranges and lemon juice and puree them together. Add this mixture to the peels.

Bring the mixture to a full boil, then add the sugar and a half a teaspoon of butter. (The butter is to prevent it from foaming too much.) Boil the mixture hard for 15 minutes or until it has thickened slightly or it has reached a temperature on a candy thermometer of 220 degrees. Stir this often, almost constantly while you are boiling this. It can scorch very quickly.

You will need to do a gel test after it has been boiling hard for 15 minutes. For me my first batch I cooked it longer than this and it became too stiff. So for the next batch I took it off the heat and tested it after 12 minutes or so. You can always cook it longer if it hasn't reached the gelling point yet.
This page discusses the gel test, just scroll down to "how do I check to ensure my soft spread made without the use of commercial pectin will form a gel?"

When the jam has reached the gel state, ladle the jam into the clean hot jars, wipe the top of the jar clean with a paper towel and seal with new 2 part lids.

Return the filled jars to the hot water bath where they were sterilized. Process in a hot water bath for 10 minutes. When the 10 minutes is over, turn off the heat and move the pot off of the heat. Let the jars sit in the water for 15 minutes. Remove the jars and let them cool.

When they have cooled test the seal. If one of them didn't seal, store in the refrigerator.

Cranberry Satsuma Mandarin Marmalade

Follow everything in the above recipe, except at the stage when you add the orange pulp to the peels, also add one and a half cups of fresh cranberries and an extra 1/4 cup lemon juice. Also add 1/2 cup more sugar.

Wednesday, November 3, 2010

Banana Whoopie Pies with Maple Cream Cheese Filling

" A gourmet who thinks of calories is like a tart who looks at her watch."-James Beard

Here's the Banana Whoopie Pie recipe I promised. I am on a Whoopie Pie kick. How can you not love them? These are absolutely delicious, reminiscent of banana bread, they are moist and tender. I sent these to my husband's work. He came back with a wonderful comment from one of the consumers, which was, "this is the best tasting thing I have ever eaten!" High praise for a humble little pie.

I survived the dentist. My jaw hurts, but I'll live.
Banana Whoopie Pies with Maple Cream Cheese Filling
I like maple, and I think it really goes well with these, but if it's not your thing, you could use regular cream cheese icing by substituting vanilla for the maple extract. Or you can make the cinnamon cream cheese from the pumpkin whoopie pies. Or even make an almond cream cheese filling by using almond extract, or make a peanut butter filling by omitting the butter and replacing it with peanut butter, the options are limitless.


adapted from this recipe at King Arthur Flour

this recipe makes 15-16 small pies

Ingredients
For Cookies
1/2 cup unsalted butter softened
1/2 cup brown sugar
1/4 cup granulated sugar
1/2 tsp salt
1 tsp vanilla extract
1 1/2 cups mashed bananas (3-4 med. bananas)
2 eggs
2 cups all purpose flour
1 tsp baking soda

For Maple Cream Cheese Filling

1 8oz package cream cheese softened
1 stick (1/2 cup) butter softened
1/2 tsp pure maple extract, I also used some maple caramel I had in the fridge, so this bumped up the maple flavor, you may need to add more than 1/2 tsp of the maple extract, I would add it and taste as you go and add more if needed.
2-3 cups sifted powdered sugar


Instructions

Preheat oven to 350 degrees. Line 2 cookie sheets with parchment paper.

In a large bowl cream together the butter, sugars and salt until fluffy, then add the bananas.

Beat in the eggs one at a time.

Whisk together the flour and baking soda. Add it to the wet mixture, mixing until evenly combined. Scrape the bowl then mix one minute more.

Scoop the dough onto the parchment lined baking sheets using a tablespoon sized cookie scoop, or use a tablespoon, leave plenty of space around them.

Bake for 9-11 minutes until the tops spring back when lightly touched with your finger, and the edges are a very light brown. Remove from the oven and cool on the baking sheets for 10 minutes before transferring the cookies to a rack to finish cooling completely.

Fill cookies when completely cool.

To make Filling

Beat together cream cheese, butter and extract. Add 2 cups of the powdered sugar and beat well. add more to reach the desired stiffness.

Monday, November 1, 2010

Thai Pumpkin Soup and other Smooth Foods

I'm getting my wisdom teeth pulled tomorrow. Yikes. I'm scared. I don't like the dentist, but I don't like being in pain, more. (One of them is hurting me.) Hence the smooth food. Not to be confused with smooth move. Which would be entirely inappropriate for a food blog. Not that talking about bad teeth in a food blog is so much better, but hey, I don't think I've ever really been appropriate anyway.
So this is one of the things I've made for my time of not being able to chew. This Thai pumpkin soup is so delicious. I was skeptical seeing that I put it together in about 15 minutes, and it has 5 ingredients or so. How could something so easy and simple taste so yummy?

Thai Pumpkin Soup

2 cups pumpkin puree (or 1 15 oz can pure pumpkin)
1 can coconut milk
1 onion chopped
3 cloves garlic chopped
a tablespoon or so of oil
1-2 tablespoons Thai red curry rub (I bought it from Pampered Chef) but you can use Thai red curry paste which you can find at the local Asian market. Oh and when you are there pick up your coconut milk. It's cheaper than at the regular grocery store.
salt to taste
lime juice, a tablespoon or so, (optional)
fresh cilantro for garnish if you have it (optional)

Put your oil in a big soup pot. Saute the onion till soft, then add garlic, saute it for a minute or two. Add the pumpkin and coconut milk and the Thai red curry. Don't add it all at once. Add a teaspoon at a time if you are sensitive to heat. How much of this you will need will depend on how hot you want it, and the brand of red curry you have. Cook it for a few minutes to let the flavors marry, then blend it smooth in a blender, or food processor, or use an immersion blender. Add salt to taste and lime juice if using. Add enough water to bring it to the consistency you would like your soup to be. Garnish with fresh cilantro (if you have it.)


I want to say "hi" to those of you who subscribe to my blog because you listen to my show on BTO. As you can see, I am doing more posting here than just the posts I make for the show. I will continue to write my usual posts that coincide with my radio program. I hope that if you enjoy my radio program you will also find my other blog entries useful.

In other smooth food news, I made some really delicious banana sorbet(?) I guess you might call it. It's really just frozen bananas in the food processor with a little sweetener. I added a splash of milk also. Pureed bananas just have a great smooth and creamy consistency. But I've also done this with frozen strawberries with great success. When I do this with the frozen strawberries I add some water to get things going, and sweetener to taste. It's a great treat when you are watching your weight since strawberries are so low in calories. It comes out like soft serve. Of course you can freeze it it you'd like it to be harder, but if it's in there for more than a day, it will be too hard. Just set it on the counter for 10 minutes or so before you eat it.

I like the banana idea since I've pretty much always got bananas in the freezer. And one can only make so much banana bread. As soon as they start to get brown spots my wonderful husband won't eat them, so in the freezer they go, peel and all. Of course you can't peel them when they are that frozen solid. A few seconds in the microwave and they are ready to be peeled. (Or 10 minutes on the counter.)
Banana peels ready for the garden
My banana peels go in my rose garden, they are good for discouraging aphids.
Wish me luck with my teeth removal!